


Info
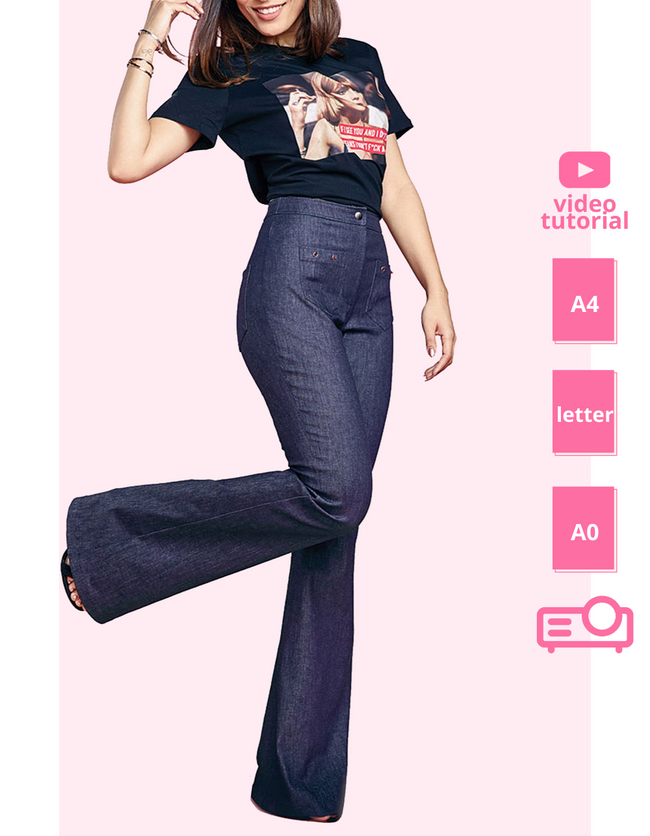
The '70s are back, and we're beyond ready to welcome them back into our lives with a jeans pattern. If you were searching for the perfect pattern to jump on the trend, look no further than these jeans. They're flared, but not too flared-just enough to show off those new heels. They're chic and sophisticated, but still relaxed and cool enough for your casual Friday at work. And they'll take you from the office to evening events in a flash!
With just one pair of classic blue jeans, you can give your style that '70s flair while still keeping things fresh. Oh yeah... and did we mention they're super comfy?
Design Highlights
- high rise waist
- flared leg
- no belt loops
How To Style And Wear Your Jeans Pattern
This denim jeans sewing pattern will be a worthy fashion ally to all your future warm and cold-weather dressing decisions. It's evident that flare pants add a graceful, curved silhouette to your already gorgeous, feminine figure. Plus, they also add length to your legs at the same time.
You can keep it simple with a graphic t-shirt or try a smart casual style with an oversized blazer or shacket. Turtlenecks are also a fantastic addition to any flare jeans ensemble - just make sure to tuck them in. Layer it with a leather jacket or opt for a cardigan - the sartorial options are endless. For afternoon dressing, opt for a see-through top, layered on top of a bodysuit or a skin-tight strappy top. You can always add a classic shoulder bag or a tote to the mix.

Alesia Jeans Sewing Pattern Overview
We're all about helping you find your own style-and that includes bringing back some of our favorite trends from the past. If there's one thing the '70s knew how to do, it was make jeans that made women look and feel great!
And if you're ready to take the plunge and make your own jeans, this guide is for you! We will walk you through how to make a pair of jeans using one of our pants sewing patterns
Sewing Level
We have designed an easy to follow Jeans Pattern that is perfect for beginners -medium sewers.
More Of What's Inside Jeans Pattern - Pattern Features:
- A printable PDF pattern format (You will need Adobe Reader on your computer to open the PDF files)
- Measurement sheet and size chart
- Step-by-step guide on how to cut and sew your pants pattern
- Assembling the pattern pieces
- Step by Step Clearly Ollustrated Instructions
- Several sizes to choose from (2-22 US / 34-54 EU)
- A4 and Letter format for printing at home
- A0 for printing at the copy center on A0 paper rolls
- Projector files for projecting the patterns directly onto the fabric using the home projector
*All files are compressed in the ZIP archive for easy downloading. All sizes have separate files, you only need to print the files that are relevant to you.
The sewing patterns we offer can be accessed instantly so you can get started right away. The pattern will be provided to you as a digital file, not as a paper pattern copy.
Supplies
How To Make Flare Jeans
Alesia is a high-waisted stretch denim pants pattern with pockets. To help you on your way, we've put together this simple guide with instructions and tips to make sure your pants turn out exactly the way you want them.

Supplies needed:
- Your Alesia Denim Pants Pattern
- Preffered fabric
- Color matching thread
- Sewing machine
- 1 zipper for pants 15-18 cm long
- 1 button
- Interlining
- 4 eyelets for the front pockets
Seam Allowance:
- 2.5 cm hem
- 3 cm on the upper part of the pockets
- 1.5 cm rest of the reserves of the pockets
- 1 cm rest of the seam
Suggested fabrics:
To start, you have to make sure the fabric you use has a little more stretch to it. That's what will keep your item fitting comfortably and looking good! Consider a medium weight woven fabric with 3-6% elasticity, suitable for trousers (stretch denim). Selvedge denim is also a great option if you can find it in your area
How much fabric do you need for your diy flare jeans?
You know how sometimes you buy some fabric and you're like, "Ah, yeah, I'm definitely *sure* this is enough!" And then once you start cutting it out and you're like, "This is definitely *not* going to be enough"?
Check out the chart below to make sure you get the right amount of fabric for your size! The amount of fabric you'll need is based on the standard useful width of fabric, between 140 and 150 centimeters. So if you're using a different width or pattern like stripes or prints - adjust the placement of pieces so that the finished garment will fit correctly to the available width.

Important!
You know that annoying feeling when you spend all this time and energy on making a garment, sewing every seam perfectly only to have it shrink after its first wash? Not cool.
To accurately cut your fabric, make sure that you test your fabric's contraction before cutting it. To do this, iron steam the material following the heat recommendations printed on the fabric.
Sewing Instructions
How To Sew Your Own Jeans - Sewing Instructions
Time to get sewing! This jeans pattern has been designed to make sewing your own pants easy. We've made sure all of the detailed instructions are simple and every step is illustrated so that you can master this pattern with ease.
Once you're done, you'll have a fresh new piece to add to your closet-and that's pretty exciting.
Applying the patch pockets
Using the pattern, copy the darts marks on the wrong side of the fabric for the back pieces. Sew the back darts and press them towards the center.
Apply the eyelets on the 2 front pockets (optional)
Mark the fold lines of the pockets
Use the serger or zigzag stitch to neaten the top edge.
Fold over the upper edge and press to crease. Stitch the top of folded pocket at 2.4 cm from the edge. fig 1

Fold in the other four edges and press to crease. fig 2

Press entire pocket turned to the right side.
Mark the pocket placement lines on the garment with chalk.
Take the completed pocket and place it to the fabric, matching the corners with the tailor’s tacks. Pin in position. fig 3

Sew approx at 0.5 cm from the edge of the pocket. Add a second seam at 0.1 cm. fig 4

On any patch pocket, it is essential to reinforce the upper corners as these take all the strain when the pocket is being used.
Sewing the pants
Sew the center back seam by pinning together the 2 back pant pieces, right side to right side, matching notches. Press the seam open and neaten the seam with a 3-thread serger stitch.
Using a 3-thread serger stitch, sew along the raw edge of the center front pieces.
Sew the center front seam, from the notch to the crotch, right sides together, leaving space open for the zipper. press the seam open. fig 5

Apply interlining on the fly and right fly wrong side(piece 4 and 5)
Inserting the zipper
Fold the left fly (piece 5)in half and overlock the edges
Overlock the round edge of the right fly (piece 4)
Using the left side of the zip, pin it to the left fly along the overlocked edge. Sew at 0.5 cm the zipper on the left fly. fig 6

To insert into the trousers, fold the fabric at the zip opening over by 1cm and iron to keep in place
Place the fold adjacent to the zipper teeth and pin in place the zipper with the left fly and the left side of the front pants. The zipper may be too long and will extend beyond the top of the fabric.
Sew along the foldline using the zipper foot, with a topstitch at 2mm starting at the crotch seam. Sew past the seam line. fig 7

To attach the zipper to the other side of the trousers, first pin the remaining right fly to the edge of the zip opening fabric with right sides together and sew at 1 cm.fig8

Open the fabric so the right side is now facing you. Sew a flattening stitch at 0.5cm
Fold the right front along the foldline. Place the foldline over the zipper and pin the foldline to the stitches on the left-hand side.
On the inside, pin the zipper tape to the fabric extension.
Sew the zipper tape to the fabric along the center of the tape.

On the right side, top-stitch around the fly zipper. Start sewing at the center front. Sew a smooth curve. fig 10

Iron the seam and the press the zip.
Side seam, Inner seam and hem
Pin the sides of the front and back piece together, right side to right side, matching notches. Sew at 1 cm and press the seam flat as it was sewn, then press the seam open. Neaten the seam with a 3-thread serger stitch. fig 11

Overlock the bottom hem allowance of the trousers.
Pin and sew the inner leg seams taking care to meet the bottom of the crotch seam and knee notches, so there are no gaps.Open up the crotch seams when flat to stop the fabric becoming bulky. Iron the seams and overlock
Turn the hem up 2.5cm to the wrong side of the pants. Pin in place and sew at 2.4 cm. fig 12

Attaching the waistband
Apply fusible interlining on the waistband pieces
Pin the outer waistband pieces together at the side seams, right side to right side. Sew together using a 1 cm seam allowance. Press the seam open. fig 13

Repeat for the inner waistband pieces. Press the seams open and overlock the bottom hem
Pin the inner and outer waistband pieces together, right side to right side, along the top concave curve, around the right front flap, and down the left front end.
Sew in place using a 1cm seam allowance, starting at the left front end and ending on the right front end. fig 14

Make small snips along the seam allowance to help release tension along the concave seam.
Turn the waistband right side out. Press.
Finish the pants
Lay the pants out flat, right side facing. Pin the waistband to the pants’s waistline, right side of the outer waistband facing the right side of the pants, raw edges aligned, and matching side seams and notches.
Sew in place and press the seam up into the waistband.
Pin the unsewn waistline edge of the inner waistband in place at the inside of the waistline. Now turn the trousers the right way round and sew a top stitch on the right side of the waistband at 2mm, starting at the zip, catching the inner waistband and the waist seam allowance in the seam. fig 15
Make a buttonhole on the right front waistband at the point indicated by the pattern markings. Hand sew your button to the left-hand side of the waistband.
That's all! You're now the proud owner of a finely-tailored pair of jeans. We hope that you enjoyed your experience with us, and that these dream jeans will be the first of many in a long custom-made wardrobe.
Video tutorial
We've created a video sewing tutorial to help.
Stay on top of your game with stylish sewing patterns
We know you're passionate about sewing. That's why we're passionate about creating sewing patterns, video tutorials, and step-by-step instructions to help you create your dream projects. If you're looking for a new way to express yourself, our patterns are the perfect way to do it!
A free pattern awaits you
And if you're still not sure if our product is right for you, try us out by downloading a free off-the-shoulder top pattern or a tiered skirt pattern . It's the perfect project to get started with our patterns and tutorials. It's an easy and fast project that'll help you learn more about what we have to offer without making a full commitment - and we're pretty sure you'll be hooked.
And if there's anything else we can do for you, let us know! We're always happy when people reach out with questions or suggestions about our content-just drop us a line. We can't wait to hear from you!
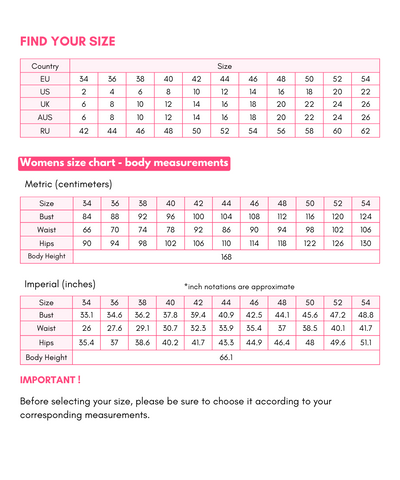
Size chart
Terms of use
This digital pattern is for personal use only. No part of the pattern can be shared, reproduced, or resold in any format. Thank you so much!
**Due to the electronic nature of this pattern, refunds and exchanges are not accepted. If you have problems or questions, feel free to contact me via message


