
The Kylie kimono playsuit pattern is the go-to outfit for those times when you want to look stylish but don't have the energy to try very hard. Perfect for those days when you wish you could just throw on something effortlessly chic and be ready in a flash. You'll love how easy it is to sew up this pantsuit pattern -and then you'll love how easy it is to wear!
How To Style And Wear Your Playsuit Pattern
Amidst the name different playsuits patterns, a wrap bodice with V-neckline is the most universally-flattering silhouette of them all - plus, they require zero mental energy to style. The Kylie pattern will effortlessly accentuate the waist and bust, while also helping enhance your curves due to the ultra-slimming effect of the waist.
For a nighttime affair, you can style your favorite playsuit with a pair of lace-u heels (or, even better, this year's trendiest platform heels), add two rows of layer-able, dainty necklaces and opt for your favorite chain bag.
For effortlessly chic, casual ensembles, style the Wrap Playsuit with a pair of sneakers and a saddle or bucket bag. If you are ready to embrace trends, opt for statement-colored loafers or almost-flat mules instead.

Kylie Playsuit Romper Pattern Overview
We've put together this sewing guide so that you can make your own playsuit using our Kylie jumpsuit sewing pattern, available for purchase in our webshop, in PDF format.
The Kylie wrapped playsuit is the ultimate summer piece. It's super easy to sew and extremely comfortable to wear. With its V-neck, kimono sleeves, elastic waist and short pants with side seam pockets, it will soon become your favorite playsuit!
Step-by-step instructions and illustrations, along with a video tutorial, will make sewing your playsuit easy.
More Of What's Inside Our Jump Suit Pattern
- A printable PDF pattern format (You will need Adobe Reader on your computer to open the PDF files)
- Measurement sheet and size chart
- Step-by-step guide on how to cut and sew your pattern
- Assembling the pattern piece
- Step by Step Instructions with Illustrations
- Different sizes you can choose from
- A4 and Letter format for printing at home
- A0 for printing at the copy center on A0 paper rolls
- Projector files for projecting the patterns directly onto the fabric using the home projector
*All files are compressed in the ZIP archive for easy downloading. All sizes have separate files, you only need to print the files that are relevant to you.

How To Make A Play Suit
A lot of love went into making this sewing pattern. I wanted it to be a pattern that not only you would love but one I'd be happy creating for myself. It is one of my favorite patterns to date and one I wish to sew again soon in different variations. Here are the supplies needed for this project:
- Your Kylie Playsuit Pattern
- Preffered fabric
- Color matching thread
- Sewing machine
- 2 small buttons
- fusible interlining for collar
- 1 cm wide elastic
- fusible interlining tape
Seam Allowance:
- 3 cm for hem
- 1 cm for the rest of the seams
Suggested fabrics
There are lots of different fabric to choose from when it comes to making you new item. Consider Light weight or medium weight woven fabrics, suitable for playsuits such as tencel twill, linen, double gauze, satin, cotton etc. For example, our sample is made of rayon
How much fabric do you need for your diy jumpsuit pattern?
Below is a chart that gives you the amount of fabric required for your size, based on a useful width of fabric between 140 and 150 centimeters. If you are using a different width or pattern, adjust the placement of pieces so that the finished garment will fit correctly to your available width.

Important!
You know how annoying it is to put all your time and effort into making a beautiful garment, only to have it shrink in the wash. The good news is that there's an easy way to avoid this problem!
Most fabrics have a heat recommendation printed on their care label or bolt. To test for contraction, simply iron your fabric at its maximum heat recommendation before cutting it.
How To Sew A Playsuit Pattern - Sewing Instructions
It's time to start sewing up this wrapped playsuit to keep you breezy and comfortable this season.
Sewing the bust.
- Apply fusible interlining tape on the center back seam allowance, from the neck opening until the first notch
- Overlock the center of the back pieces separately
- Sew the center back seam, from the notch down. Press the seam open. fig 1
- Sew the hem of the center back neck slit (turned 1 cm inwards), starting from the left top neckline up till the notch and up to the right top neckline, on the other side. Iron the slit. fig 2
- Pin the front pieces to the back piece at the shoulder seam, aligning the raw edges; right sides together
- Sew the shoulder seams using a 1 cm seam allowance. Press the seam toward the back, and neaten the seam using a 3-thread serger stitch or a small zigzag stitch. fig 3

- Overlock the raw edge of the sleeve bottom
- Fold the sleeve hem following the notches on the pattern, wrong side to wrong side. Put the hem in pins.
- Pin the sleeve, flat, right side to right side, to the armhole. Align the sleeve between the two notches on the armhole, and match the central notch with the shoulder seam.
- Sew in place using a 1 cm seam allowance. Neaten the seam using a 3-thread serger stitch or a small zigzag stitch and press toward the sleeve
- Repeat steps 7-9 for the other sleeve.
- Fold the sleeve right side to right side, so that the sleeve edges and side seams align. Pin, taking care to meet the notches.
- Using a 1 cm seam allowance, sew the sleeve's underarm seam and the side seam without stopping. fig 4
- Clip into the underarm intersection to release the tension, being careful not to cut the stitches.
- Press the seam toward the back, and neaten the seam using a 3-thread serger stitch or a small zigzag stitch.
- Sew a topstitch on the sleeve hem at 1mm. Press the seam and the sleeve hem. fig 5

Sewing the collar
- Apply a fusible interlining to the collar pieces (if needed).
- cut 2 sections of thin elastic (2.5 cm long) to create button loops.
- Pin the loops to the fabric, using the notches on the pattern. The folded end of the loop should be on the inner sewing line and the cut ends to the raw edge.
- Sew the loops just inside the seam allowance (0.5 cm) at the center line
- Overlock the outer raw edges of the inner collar pieces. fig6
- Sew the collar pieces 2 by 2 (pair - one with a raw edge and 1 with overlocked edge) at the center back and inner seam, right sides together, taking care to meet the notches. Clip across the corners. Turn the collar through to the right side and press.fig 7

- Place the collar to the neckline, right sides together, matching the notches. Pin to secure and sew at 1 cm. fig 8
- Take the overlocked edge seam allowance of the under collar and pin in place around the neck edge, taking care to insert the seam allowance inside the collar. Make sure the two leading front edges of the collar are symmetrical.
- Use a flat top stitch to secure the under collar at the neck edge. Sew at 0.1 cm. fig 9
- Overlap the 2 front pieces in the center front, matching the notches and sew at 0.5 cm to secure it
Sewing the cord
- Apply fusible interlining on the belt pieces (if needed)
- Sew the 2 belt pieces together at the center back, right sides together, at 1 cm. Press the seam open.
- Fold the belt in half, right side to right side so the fusible is showing. Pin.
- Sew along all the raw edges using a 1 cm seam allowance. Remember to leave a gap of approx. 3in (8cm) at the center back to turn the belt through. Remove the bulk from the corners.
- Once the belt has been turned to the right side, press the seam carefully so that it is on the very edge.
- Hand sew the gap at the center back closed with a flat fell or blind hem stitch.
Sewing the pants
- Apply a piece of fusible tape on the front pants pieces along the line of the pocket. fig 11
- Iron the pocket piece in half, following the notches.
- Place the pocket lining to the front of the garment, right side to right side. Pin in place.
- Sew the lining in place, using a 1cm seam allowance. Open out the pocket and press the seam toward the lining.fig 12
- Top-stitch the lining at 0.5 cm from the edge, catching the seam allowance in the seam as well.
- Turn the lining to the inside. Press so that the lining is not visible on the outside.
- Sew the bottom seam of the pocket at 1 cm and neaten the seam using a 3-thread serger stitch or a small zigzag stitch. fig 13

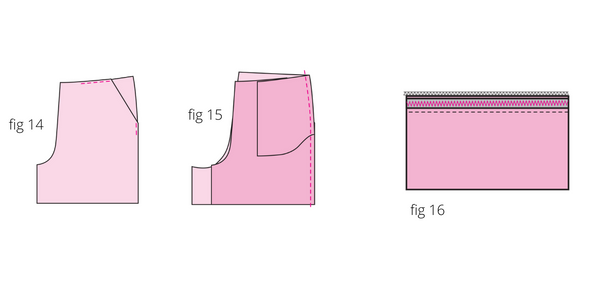
- On the right side of the garment, pin the pocket bag along the top and side, and sew at 0.5 cm to secure the side seam pockets. fig 14
- Pin the sides of the front and back piece together, right side to right side, matching notches. Sew at 1 cm and press the seam flat as it was sewn, then press the seam open. Neaten the seam with a 3-thread serger stitch. fig 15
- Sew the center front seam by pinning together the 2 front pant pieces, right side to right side, matching notches. Press the seam open and neaten the seam with a 3-thread serger stitch.
- Repeat with the center back seam.
- Sew the inner seam of the pants at 1cm, placing the fabric right side to right side and matching the notches. Neaten the seam with a 3-thread serger stitch.
- Using a 3-thread serger stitch, sew along the raw edge of the hem allowance. Turn up the hem 3 cm to the wrong side of the fabric. Press in place and sew at 2.8 cm.
- Pin the bust and the pants together on the waist line, right side to right side, matching notches. Sew at 1 cm and press the seam flat as it was sewn. Neaten the seam with a 3-thread serger stitch.
- Cut a piece of elastic to the required length (look in the Fabric requirements table above). Pull the two ends of the elastic together and sew a square shape with an X for strength.
- Apply the elastic on the waistline seam with a zig-zag stitch or normal one. fig 16
- Sew the 2 buttons on the center back, according to the loops
You're all done! Congratulations on your hard work! Your playsuit pattern turned into a stellar look item for you to share the world.
We've created a video sewing tutorial to make it easier!
Feeling a little unsteady on your sewing skills? Worried that you might not get the hang of this?
We totally get it - sewing can be hard. That's why we made a video demonstration for this sewing project! We know that some people prefer to learn by watching someone do it in front of them, so we wanted to make sure we had you covered! The sewing tutorial will walk you through every part of this sewing project and help you feel confident in your ability to create something worthy to wear and flaunt. You can find the video on our YouTube channel!
Find a sewing pattern to suit your needs.
We know what it's like to be looking for the perfect digital pattern so we've made sure there are lots of options available at www.georgettepatterns.com! We're pretty sure there's something on our webshop that will fit your needs perfectly-and if not? Just let us know! We'll create it.
See what makes us a good fit for your sewing projects by trying our free pattern for an off-the-shoulder top. The sewing digital pattern, video tutorial, and step-by-step instructions will help you sew this top easily.
Thank you for reading! We know that it can be hard to find good information on a topic as specific as this one. We're always excited when we can provide useful information on a subject like this!
![Master That Effortless Vibe In A Tiered Skirt Pattern [FREE Printable PDF Pattern]](http://www.georgettepatterns.com/cdn/shop/articles/maxi_tiered_skirt_pattern_cover.png?v=1658478106&width=1)
![Here's How To Sew A Halter Dress Pattern You'll Adore [Sewing Guide + Video Tutorial]](http://www.georgettepatterns.com/cdn/shop/articles/halter_dress_pattern.jpg?v=1653388889&width=1)


