


Info
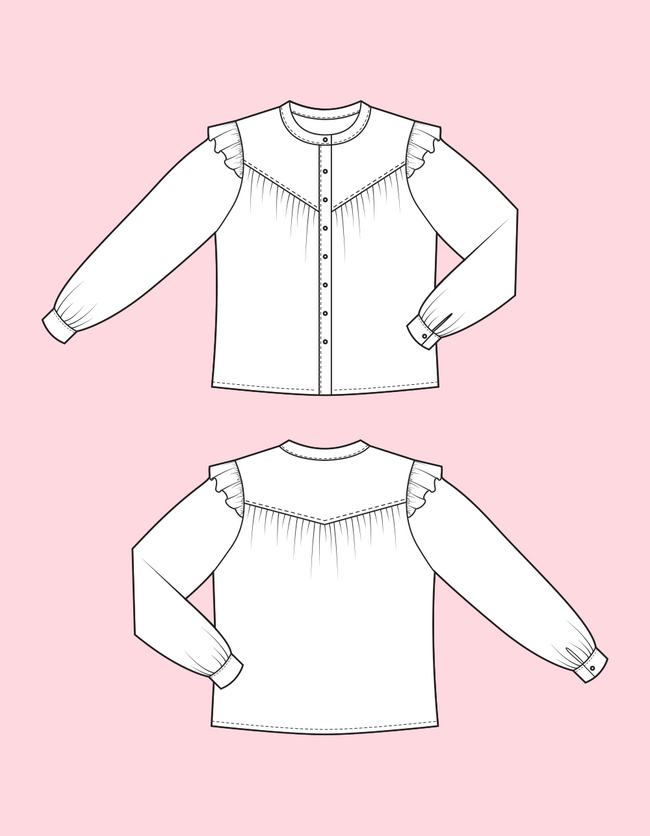
Introducing the new oversized button down shirt Pattern! This easy-to-use pattern is perfect for creating a stylish and flattering ruffle shirt. With long sleeves and a button down front, this shirt is sure to become a closet staple.
Sewing Pattern Overview
This floaty style is ideal for those steamy days, when you want to look put-together but still stay cool. The ruffle details add a touch of femininity, while the loose silhouette keeps you comfortable in the heat. Plus, this pattern is so versatile - you can make it in any fabric, from light and airy cotton to breezy linen, so you can customize it to your own personal style.
Sewing Level
The May shirt pattern is great for a medium skilled sewing enthusiast
More Of What's Inside Our Digital Patterns
- A printable PDF pattern format (You will need Adobe Reader on your computer to open the PDF files)
- Measurement sheet and size chart
- Step-by-step guide on how to cut and sew your pattern
- Assembling the pattern piece
- Step by Step Instructions with Illustrations
- Sizes spanning from US 2-14 / EU 34-46
- A4 and Letter format for printing at home
- A0 for printing at the copy center on A0 paper rolls
- Projector files for projecting the patterns directly onto the fabric using the home projector
Supplies
Sewing Your Perfect Size Long Sleeve Shirt Pattern
With these easy-to-follow instructions, you'll have a gorgeous new shirt to add to your wardrobe in no time!
The fun part is about to begin!
You'll need:
- Your Oversized Shirt Sewing Pattern
- Preferred fabric
- Color matching thread
- Fusible reinforcement tape - max 0.7 cm width
- fusible interfacing
- snaps/buttons
- Sewing machine
Seam Allowances
- 1 cm seam
- 1.5 cm hem
Suggested Fabric: light weight fabrics
a light weight woven fabric such as linen, cotton gauze, muslin, rayon, silk, crepe, satin, chambray etc. Fabrics with a nice drape
How much fabric do you need for your diy oversized fit shirt?
Keep in mind: the amount of fabric necessary depends on the width of your material. All sizes are based on a standard fabric width of 140-150cm, so please double-check the table below for both size and fabric requirments before beginning your project. If you're working with a different kind of cloth (say, stripes or plaids), you'll need to adjust how the pieces fit together so that it utilizes the available width you have.

Check your contraction!
Before cutting, examine the fabric's contraction. Steaming the cloth at its maximum heat level will ensure that the finished garment maintains its size after washing and does not shrink during the laundry process. Buying 5% more than your project needs is a good idea if you want to be safe.
How To Sew It
Sewing A Button Up Shirt - Instructions
Sewing the bodice
- Apply fusible reinforcement tape on the shoulders and bottom of the front and back yoke. fig 1
- Gather the top of the front pieces: Sew at a great pace one row of gathers at 0,5 cm and the second raw at 1.5 cm. Leave long tails of thread for gathering. Repeat with the back piece. fig 2
- Place the top of the front piece to the bottom of the yoke , right side to right side. Match the notches and ends. Gently pull on the two ends of the thread on the wrong side-the fabric will gather along the thread. Secure the threads at the one end to prevent the stitches from pulling out. Even out the gathers and pin. Sew at 1 cm, press the seam and overlock. fig 3
- Top-stitch on the yoke, catching the seam allowance also, using the edge of the machine foot as a guide.
- Repeat with the back and the back yoke
- Sew the shoulders and side seam of the front and back pieces, right sides together. Press the seam open and overlock. fig 4
- Using a 3-thread serger stitch, sew along the raw edge of the hem allowance. Turn up the hem 1.5 cm to the wrong side of the work. Pin in place and sew at 1.3 cm. fig 5
- Apply fusible interlining on the button stand pieces, on the wrong side.
- Fold in half the button stands, length wise. Fold one long edge of the button stand again, 1 cm to the wrong side. fig 6
- Sew at 1.5cm the bottom of the button stand, right sides together. Cut narrow the corner, turn the button stand inside out and press.
- Apply the button stand on the center front pieces, right sides together, taking care to meet the notches. Pin in place and sew at 1 cm. fig 8
- Take the turned seam allowance of the under button stand and pin in place around the seam, taking care to insert the seam allowance inside the collar. Make sure the two leading front edges of the button stand are symmetrical.
- Use a flat top stitch to secure the under button stand at the seam edge. Sew at 0.1 cm. fig 9
Sewing the sleeve
- Sew the bias tape (piece 10) on the sleeve slit: Place the bias strip to the sleeve slit edge, right side to right side. Sew the bias to the edge using the edge of the machine foot as a guide. Wrap the folded edge of the bias to the wrong side of the garment. Place the folded edge to the sewn line and topstitch at 0.1 cm. fig 10
- Prepare your overlock machine (serger) and sew a narrow 3 thread roll stitch to the outer raw edges of the sleeve ruffle. fig 11
- Apply the sleeve ruffle on top the the sleeve cap, between the notches marked on the pattern, wrong side to right side. Sew in place using a 0.5 cm seam allowance. fig 12
- Take the sleeve cap and sew one row of gathers at 0.5 cm and the second row at 1.5 cm on the top part, between the notches marked on the pattern. Sew at a great pace and leave long tails of thread for gathering. fig 13
- Sew the side seam of the sleeve, right sides together. Press and overlock the seam. fig 14
- Apply fusible interlining on the cuff pieces.
- Take 1 piece of cuff and press it in half lengthwise , wrong side to wrong side; and then bend 1 cm inwards, wrong side to wrong side, one top part and press . fig 15
- Join the side edges of the cuff piece (right sides together) using a 1 cm seam allowance. cut the corners and turn the cuff inside out. Press to form the final cuff.
- Take the sleeve and sew one row of gathers at 0.5 cm and the second row at 1.5 cm on the bottom part. Sew at a great pace and leave long tails of thread for gathering.
- Place the bottom of the sleeve that is going to be gathered to the top of the outer cuff right, side to right side.
- Gently pull on the two ends of the thread on the wrong side-the fabric will gather along the thread. fig 16
- When all the gathers are in place, sew the sleeve and cuff together, using a 1 cm seam allowance. Press the seam gently
- Turn under the seam allowance of the under cuff and pin in place around the cuff edge, taking care to insert the seam allowance inside the cuff. Make sure the two leading front edges of the cuff are symmetrical.
- Use a flat top stitch to secure the under cuff at the cuff edge. Sew at 0.5 cm. fig 17
- Place the sleeve into the armhole, right side to right side. Match the notches and the underarm seams. Pull up the gathers to make the sleeve head fit the armhole. Pin from the sleeve side. Sew at 1 cm. Press and overlock the seam.
Sewing the collar
- Apply fusible interlining on the wrong side of the collar pieces.
- Take 1 piece of collar and bend 1 cm inwards, wrong side to wrong side, the outer edge and press. fig 18
- Sew the upper and under collar, right sides together, sewing around the sides and the inner edge. Sew a sharp point by pivoting at the corners. fig 19
- Trim the seam allowance. Remove the surplus fabric at the corners. Turn the collar to the right side and press. fig 20
- Sew the collar on the bodice ( top collar right side -with the bodice right side), at 1 cm, taking care to meet the notches
- Turn under the lower edge seam allowance on the under collar and pin in place around the neck edge, taking care to insert the seam allowance inside the collar. Make sure the two leading front edges of the collar are symmetrical. fig 21
- Use a flat top stitch to secure the under collar at the neck edge. Sew at 0.5 cm. fig 22
- Make buttonholes on the right buttonstand and upper side of the cuff at the point indicated by the pattern markings. Sew the buttons on the left button stand and underside of the cuff.
Video Tutorial
Sew Along Your Shirt Pattern With A Video Sewing Tutorial
This easy-to-follow sewing tutorial is assembled so you can watch and learn at your own pace. The comprehensive video will show you how to put the piece together step by step until completion. You can pause and rewind the Tutorial as many times as needed, allowing for a full understanding of the pattern before beginning your project--so you're guaranteed an impressive end result!
Ready to become the creator of your own style?
You may utilize your art of sewing to express your own personal style in a distinctive manner. Professional sewing patterns may help you make bespoke clothing that resembles high-end apparel.
Our priority is to help you finish your next project quickly and effortlessly by creating sewing patterns that manage all of the technicalities for you.
We want you to concentrate on being innovative and having fun while sewing!
Available Now: A Free Sewing Pattern
We understand that you don't have time to waste on sewing patterns that don't work for you. That's why we created this off-the-shoulder blouse pattern-it's simple and easy to use so you can get familiar with our style. Plus, our free skirt pattern pairs perfectly with it. So go ahead and try us out! We're confident that our way of doing things will be a good fit for your sewing needs
Size Chart

Terms of use
This digital pattern is for personal use only. No part of the pattern can be shared, reproduced, or resold in any format. Thank you so much!
**Due to the electronic nature of this pattern, refunds and exchanges are not accepted. If you have problems or questions, feel free to contact me via Etsy message.


